Tuesday, August 30, 2011

Chocolate Pudding Squares on a rainy Tuesday afternoon


It's pouring outside, and Lilla A is home, and under the weather. Fever and a very tired little mommy. I am swinging it solo these last few days, as The Goat is off to Scotland to play a wedding in the famous Dundas castle outside of Edinburgh.
http://www.dundascastle.co.uk/I tell you jealousy is on the tip of my tongue. Yep, mommy at home with the sick child and pappy out rock'n'rollin'. Gee, I am feeling a little redemption going on in my kitchen. Pretty pudding all to myself that you can eat with your fingers. Who needs a 5 kilometer drive way anyways?


This pretty little gem comes from the newest book called Chewy,Gooey,Crispy,Crunchy by Alice Medrich. After reading the book from front to back, studying every little detail. I now bake much differently then I did before. I have discovered that you do need to pay attention to all the little things, and really, REALLY listen to what the authors say in their directions. Stir to just combined, use a whisk, level out your flours, use only the right percentage of cocoa called in the recipe. It can and will either make or break your baking project.


 I highly recommend this book to any baker out there.You will learn so many valuable tips on being a more successful baker.This three layer little beauty, has such depth of taste and texture. The soft creamy pudding and the kick of the bittersweet chocolate layer and then the crunch of the brown sugar shortbread-ish caramel flavored cookie bottom. Great bar, and completely different way to serve up pudding. 


Chocolate Pudding Bars via Alice Medrich (artisan)


Ingredients:


For the crust:


7 tablespoons butter, melted and still warm
1/4 cup (1.75 ounces) packed brown sugar
½ teaspoon pure vanilla extract
3/8 teaspoon salt
1 cup (4.5 ounces) unbleached all purpose flour
2 ounces semisweet or bittersweet chocolate, chopped, or purchased chocolate chips or chunks


For the filling:


1/4 cup (1.75 ounces) sugar
1/3 cup (1 ounce) unsweetened coca powder ( I prefer natural)
2 tablespoons cornstarch
1/8 teaspoon salt
1½ cups whole milk
½ cup heavy cream
5 ounces semisweet or bittersweet chocolate with up to 62% cacao, finely chopped
1 teaspoon pure vanilla extract
1 tablespoon dark rum( I used Amaretto)Because I love the almond flavor with chocolate.


Method:


Line a ) inch square metal baking pan, the bottom and all 4 sides lined with foil-Light bulb  moment: flip your pan over and cover gently the bottom of the pan and about 2 inches over the sides. Slowly and gently ease off the foil and insert into the pan.


Preheat the oven to 350F or 177C. Position a rack in the lower third of the oven.


To make the crust:  In a medium bowl, combine the melted butter with the brown sugar, vanilla, and salt.Add the flour and mix just until blended. don't worry if the dough seems too soft or oily, this is normal.Press the dough evenly and smoothly over the bottom of the lined pan. Bake for 15-20 minutes, until the crust is deep golden brown at the the edges. Remove from the oven and immediately sprinkle the chocolate over the hot crust.


It goes quite quickly
Let stand for 2-3 minutes to melt the chocolate. Use a pastry brush or rubber spatula to spread the chocolate over the surface of the crust in a thin but thorough layer.Let the crust cool and then refrigerate it until the chocolate is set.


To make the filling:


In a heavy medium-large saucepan, whisk the sugar, cocoa, cornstarch, and salt to blend. Add about 3 tablespoons of the milk and whisk to form a smooth paste. I needed to add a little more than 3 tablespoons to make a nice paste.Whisk in the remaining milk and cream. Heat the mixture over medium heat, stirring constantly with a flat-ended heatproof spatula or wooden spoon and scraping the bottom, sides, and corners of the pan until the pudding thickens and begins to bubble at the edges, 5-6 minutes. Add the chocolate, vanilla and the rum...(choice of liquor) stir a bit faster to smooth out the pudding, cook the starch, and melt the chocolate, about 1½ minutes.


Scrape the hot pudding onto the crust and level it with one or two strokes of the spatula. Let the pudding cool, undisturbed(without mixing, jiggling, or spooning out a taste), at room temperature for 1 hour. Refrigerate the pan, uncovered, until the pudding is completely cool.Cover it and chill for at least several hours or overnight. Use the edges of the foil to lift the the bars from the pan and transfer to  cutting board.


Cut into twenty bars or use a cookie cutter to cut out shapes. Store the leftovers in the refrigerator as you would with pudding. 
For the love of Pudding!

 I have to admit these are fun, and festive to make. They can be made in advance and served at any form of party you will have. This one is for the pudding lovers out there.    

Thursday, August 25, 2011

Fresh Ginger Cake and the Sleeping Indian

A little bit of heaven..really

Who says that you can not fall in love with a cake? Can someone answer this question for me? I am not the biggest sweet eater, but oh my, my... this cake is like Brad is to Angelina. Just got to have it.

 As some of my readers have realized by now. I am a huge fan of David Lebovitz, and just got my copy of Ready for dessert (Tenn Speed Press)
Can you blame me for wanting to share this delicious recipe with you?? I am sure for those who spend the time making this amazing cake  you will not be disappointed in any way. It is like the Valentino of Haute couture. Stylish, sophisticated and unpredictably beautiful. To touch, taste and see. This cake is a full bodied cake that you will be completely over joyed with. In the original recipe the author uses mild- flavored molasses, but living in Sweden. It is really difficult to track it down, so I used (Lyle's black Treacle.)Which is made from cane molasses and is a export from England. Available on the internet or specialty stores.

Less is more with this cake. Perhaps a dollop of a good whipped cream, but I think this is a cake that can carry it's own. Go forth my happy foodies, and bake this cake!  Adapted(and tweaked) from David Lebovitz's Fresh Ginger Cake

use your processor for a fine mince

  • Ingredients:
  • 4-ounce (115-g) piece of fresh ginger, peeled and thinly sliced
  • 1/3 cup (80ml) Lyle's black Treacle or any molasses available to you
  • 1 cup (200g) sugar
  • 1 cup (250ml) vegetable oil ( I used ½ cup sunflower and ½ cup corn oil)
  • 2½ cups (350g) all- purpose flour
  • 1 teaspoon ground cinnamon
  • ½ teaspoon ground cloves
  • ½ teaspoon ground black pepper ( fine ground)
  • 1 cup (250ml) water
  •  2 teaspoons baking soda
2 large eggs, at room temperature


Method:


Makes one 9-inch (23-cm) cake 10-12 servings


Preheat the oven to 350 degrees f or 175 degrees C. butter the bottom and sides of a 9 inch spring-form or round cake pan with 2- inch sides and line the bottom with a circle of baking paper.


In a food processor fitted with the metal blade or with a chef's knife, chop the ginger until very fine. set aside.
In a large bowl, mix together the molasses, sugar, and oil. In a medium bowl, whisk the hot water into the molasses mixture, then add the chopped ginger.


Gradually sift the flour mixture over the molasses mixture, whisking to combine. Add the eggs and whisk until thoroughly blended. Scrape the batter into the prepared spring form pan or cake pan and bake until the top of the cake springs back when lightly pressed with a finger or a toothpick inserted into the center come out clean, about one hour.Let cool completely.


Run a knife around the sides of the cake to help loosen it from the pan. Invert the cake onto a plate, peel off the parchment paper, then re-invert it onto a serving platter.


Storage can be kept for up to 5 days as this cake is extremely moist. It can be also frozen for up to one month.


This past weekend we got to spend a fantastic overnight stay on the island of Stysrö. It is located outside of Gothenburg on the west coast of Sweden in the beautiful archipelago. Our good friends J. and T. and their family fed us to the stage of food coma, and The Goat played in the local club in the evening. 
I had to walk off some of that fantastic food, so I did a little island exploring and I wanted to share it with you all. I hope you enjoy some of my pictures. 
can you see it? The Sleeping Indian
Stysrö is a car less island. Our way of getting around. so much speed and fun
Scandinavia at it's most beautiful. Summer....
amazing day 
Thanks for dropping by, and welcome to my backyard.  

Monday, August 22, 2011

Google for Noodles-Turkey breast and egg noodle stir fry

Textures
Where has the summer gone? Is it already time to pack up our smiles and go forth with are gloomy winter hesitance? The days are getting shorter and the longing to walk outside without a jacket past the early evening is far and few between. It is that feeling of loss. The loss of sleeping in, the loss of eating on the balcony, the loss of a impending vacation. It is back to school today, and forever my mornings will be different. No more Mrs. nice guy it's on schedule from now on.

I am still a little new to this blog thing, and mastering the photography is a very big learning step for me. How I admire all those blogs out there with beautiful photography. I will someday figure it all out and will be giddy with glee to be able to join the ranks of them. I am searching for who I really am. More a cook or a baker. I am torn , I am having a hard time to decide if this blog should be a  specific baking blog or a blending of everything that comes out of my kitchen. Either way, it is in it's growing stage and we will just have to see where it will go.


Ingredients:

300 g skinless and boneless turkey breast or skinless and boneless chicken thigh/leg, cut into small pieces
10 oz fresh or dried egg noodles 
3 tablespoons cooking oil 
2-3 cloves of garlic, minced
½ cup slice cucumber and 1 small yellow pepper
1/4 shredded carrot 
1 tablespoon soy sauce
1 tablespoon oyster sauce or Pad Thai sauce
2 tablespoons water

Marinade:

½ teaspoon soy sauce-Ketjap Manis (Indonesian soy sauce)
 1teaspoon oyster or Pad Thai sauce
½ tablespoon Worcestershire sauce
1 teaspoon Premium sweet vinegar  ( all available at Asian markets)
3 dashes white pepper
1 teaspoon brown sugar or white
½ teaspoon sesame oil
1 teaspoon grated ginger

Grate the ginger and add all the ingredients to a large bowl. Stir to combine and add in the turkey or chicken. Let sit in marinade for at least 15-20 minutes.

Method:

Prepare the egg noddles. Follow the instructions according to the package.Heat up a wok/ frying pan with 1 tablespoon of the cooking oil. when the wok is heated, add the turkey into the wok/ frying pan and pan fry the turkey until slightly charred and blackened on both sides.
Remove the turkey from the wok/ frying pan and into a clean bowl set aside.
Clean the wok/ frying pan and heat it up with the remaining 2 tablespoons of oil. Add the minced garlic and stir fry until light brown or aromatic. Add the shredded cabbage and yellow pepper in to the wok/ frying pan and do a few quick stirs. Stir in the noodles, soy sauce, oyster/ Pad Thai sauce and water. Continue to stir fry until the noodles are well blended with all the seasonings and completely cooked through. Add more to taste of any of the above seasonings a little more oyster suace, soya sauce, etc.. until you tweak it to your likening. Add in a little Thai sweet basil leaves and transfer to serving bowls and sprinkle on some slice spring onion, slice cucumber, cilantro.   A great  meal for two, or three.. Serve immediately. 

Friday, August 19, 2011

Hummus in the afternoon with Kalamatta olives and olive oil


Mezze anyone`


Growing up in Calgary in the early nineties had it's advantages. It was still a relatively small city of 700 000  it was safe
and my groups of friends could walk the streets at night with out fear. Singing the latest songs at the top of our lungs, laughing about our life and wondering how we all would grow up. Some of us moved away like myself to find greener pastures. Some of us stayed planted in the city that they love. We all were so different from one another. The punk, the girl next door( who was really a wild cat) the head banger umm.. me... The dancer, the one who ALWAYS had the skater   high school sweetheart  boyfriend...Etc, but one thing that always made us similar was the love to eat.

Calgary, is a city that you can fall in love with food. The cultural diversity in food availably is mind boggling.Whatever  you had a craving for we have it. From sushi, to fondue Calgary is a foodies delight, and we took advantage of  this pretty much everyday.We would frequent almost daily  Cedars Lebanese deli on 3rd st. We would go there just for the lush hummus and falafel no matter what time of the day. The hummus was smooth and creamy, with a slight bitterness from the
lemon and the fluffiness.

 It is nice to have my memories of past friendships and good meals intertwined.Two  of my favorite things in life. Good people and good food. I hope you will agree with me that not all hummus is created equally, nor are all the possible ways of making it, but I love this recipe and I hope you will too. 

Ingredients:
makes enough for at least 4

  • 2 -14ounce cans of organic chickpeas drained
  • 2-4 cloves of garlic pealed
  • 3 tablespoons of organic tahini (sesame paste)
  • ½ teaspoon red pepper flakes
  • juice of two lemons
  • 1/4 teaspoon of lemon zest
  • salt and pepper to taste
  • water as needed for processing
½ teaspoon baking soda this is where the fluffiness comes from aha moment for me...:)

Method:

Process chickpeas, garlic, thaini, red pepper flakes, lemon juice and the zest in your food processor or hand help mixer. Slowly drizzle in the water by the spoonful until the mixture is smooth and and the hummus is to the consistency of a thick, but smooth dip. Add as much salt and pepper to taste, or more heat if you like. Stir or blitz the baking soda for a couple seconds. Allow the hummus to sit for several minutes about 20 or so. Remove from your processor and either serve with your favorite bread such as pita or a combination of raw vegetables. Carrots, radish, cucumbers just to name a few. Add to your Mezze inspired meal, or just as a comfort meal between you and the moment.  Add a handful of your favorite black olives a drizzle of olive oil and a pinch of chopped parsley. 

This can be made several days ahead. It can get spicier and flavorful after 24 hours. I  serve this with a selection of fresh vegetables and breads from my local middle eastern bakery. For example, pita, flat bread or even a spread on hard  toast bread. It was nice to sit and ponder the memories of my youth and I am incredibly  lucky to have grown up in such a place that has such diverse people and food. It really has shaped my taste buds, my willingness to try new things and to miss my beloved Canada more than I already do. To my dear friends ,I miss you so very much. Stacey, Jenn, and everyone else. I love ya! see you soon.


Wednesday, August 17, 2011

Candy Chocolate Ganache Covered Brownies For Lilla A

candy chocolate brownies with a ganache and Millie Lillies
Yesterday was the day everybody remembers that Elvis died. August 16th 1977. I was four years old. I never would of imagined that August 16 would be a day that would be so bitter sweet for my family. Nearly ten years later on the same exact day my grandpa passed away, and then 20 years to the day our lilla A was welcomed to this world. It is incredible how life throws you some curve balls.
Six years of laughter and six years of little tears, our charismatic, bilingual, kind, generous, funny  lovely boy is now ready for school and talking like a 50 year old. Where does the time go?

Every year I whip up some sort of theme plan for Lilla A's birthday parties, but this year I had to post pone, as I was sick for the last week. Typical!! I have a Star wars themed party this year with a Darth Vader cake pan  and all the goodies 8, six year olds could ever dream of. As it was his real birthday yesterday, I had to produce some sort of  cake for the little man. Here is my  famously scrumptious chocolate lovers to die for brownie explosion.Tread lightly you may have an overdose of goodness here. Do not say I did not warn you.....

Candy jazzes up ganache-glazed squares I used  Milly Lilly's
INGREDIENTS:

  • 2/3 cup -(150ml )butter add 1 tsp of salt if using unsalted butter
  • 7 oz -(210g) bittersweet chocolate, chopped
  • 5 oz-(150g)  unsweetened chocolate, chopped
  • 1½ cups-(375ml) granulated sugar
  • 2 tsp vanilla
  • 4 eggs
  • 1 cup(250ml) all- purpose flour
  • TOPPING: 
  • 5oz (150g) bittersweet chocolate
  • 2/3 cup (150ml) whipping cream
  •  assorted candy for sprinkling on top of ganache

melt slowly and stir be careful not to burn
  • Method:
Line 13X) inch metal cake pan with parchment paper pr baking paper; set aside.
In a saucepan over medium-low heat, melt the butter and all the chocolate(not including the chocolate for the ganache); until  smooth. Let cool for 10 minutes set to the side.
make sure to whisk in eggs 
use the same pot for everything, perfect!
baked for 25 minuted and still moist in the middle
In the same pan, whisk in the sugar and the vanilla. Whisk in the eggs ONE AT A TIME,using a wooden spoon, stir in the flour and the salt. Scrape into the prepared pan; smooth top. Bake in the center of your oven rack at 350 degrees f or 180 degrees C until cake tester inserted in center comes out with a few moist crumbs clinging, 25 minutes. Let cool on rack.

Topping:
ganache is the best ever
need I say more? yummo
Place chocolate in a heatproof bowl. In saucepan, heat cream until boiling; pour over chocolate and whisk until smooth.Let cool 3-4 minutes and spread over cooled brownies. I like to just tilt the pan in every direction until the top is completely covered. No need to use any tools. A nice even surface is achieved. Sprinkle immediately with your choice of candy's and set in the refrigerator until set. At least one hour. 

Happy 6th Birthday Lilla A! Mommy Loves you so
If you love a good brownie, then please do give these a try. You so will not be disappointed. Once you whip these up a few times you can tweak them to any way you want. Make them with white chocolate ganache, or add more , nuts,milk chocolate to the mix. It is really up to you. Go forth and bake my friends. Till next time. Hej då!

Tuesday, August 16, 2011

Salmon and root vegetable gratin with infused thyme

slow cooked in low oven for 2 hours equals one happy Goat

okay, who is with me? Gratin, love it or just about LOVEEEE it! Oh, can you ever go wrong with a dish of creamy goodness.Layer after layer of starch heaven slathered in caramelized onions poached in  infused heavy cream, garlic and thyme of course  butter and cheese. Slow baked until just perfect?

The other day Lilla A's Godmother L. and sir P. Came to celebrate his 6 th birthday with a traditional Swedish meal. Ham Hock and root vegetable mash. ( will post at a later date) and of course the Goat is a goat and only eats some creatures from the sea. Namely salmon and their  little friends...He's actually a pesco-vegetarian eats fish etc... So.. I needed to cook him a meal as well. This is what I came up with using all the same ingredients for the meat eaters, just substituting  the ham hock for fresh  salmon. 
Serves 4-6
Ingredients:
2 small salmon file sliced in strips
6-8 medium gratin potatoes ones good for mashing work well here as well thinly sliced

1/4 head of turnip thinly sliced
1-2 large carrots thinly sliced
1 yellow onion thinly sliced
2 garlic cloves, grated
1 cup of strong flavored cheese
3 tablespoons butter (½ tablespoon to grease the oven dish)
1½ cups of heavy cream
1 cup of half and half or 27% fat cream
½ cup of full fat milk-or 2%
1 teaspoon of dried thyme or 2 sprigs of fresh
salt and pepper

Method for infused cream:

In a frying pan melt butter over medium low heat. Add in your sliced onions and continue to cook until they are golden and somewhat caramelized.Pour in your liquids and reduce heat to the lowest setting. Add your thyme and salt and pepper, and grate in your garlic.Turn off heat but let  it sit to cool on the burner.
let rest with all the goodness for at least 20 minutes

Norwegian Salmon 
almost ready for the oven. Just add cheese and cover
Slice your salmon into slices and season with salt and pepper set aside. Grease your oven dish. I used an dutch oven, and begin to layer your root vegetables remembering to sprinkle a little salt and pepper and dried thyme over each layer as you proceed(using a light hand).Layer a few slices of  fish and continue to layer until your top layer is just of root vegetables. Pour over the infused mixture(if using fresh thyme remove the sprigs) and if you have not enough infused cream just top it up with more cream or full fat milk.


 Cover with the grated cheese and add a doamed lid(so cheese does not stick to it) If using tin foil. Wait with the cheese and cover and let cook for 2 hours at 180 degrees C and then when you can slide a wooden skewer or fork through to the bottom of the dish easily then you can remove the tin foil and add the cheese and let bake until nice and browned in an 100 degree c oven. Let stand 15 minutes before serving.

The Goat and Miss L loved this to bits. (Sir P is allergic to fish,) so we all had a fantastic dinner and a lot of good laughs. Evenings like this is exactly why I started this blog. To be able to share my cooking with people as if they were guests in my kitchen. Warm hearts to you all.Enjoy

Saturday, August 13, 2011

Lazy Saturday Egg Salad

creamy loveliness


Sorry Lilla A. Today we will have to cancel your 6th birthday party, because mommy is ill. Yes of course of all days. I am so feeling under the weather these last few days, and it's looking like all I can do is spend time here on It's all about the food. I know I just posted yesterday, but I have the time now to post things that I have been meaning to post. There's not much to say about egg salad. You either love it or you hate it. Most of us who grew up in a Commonwealth country or the States, are pretty much familiar to the dreaded or beloved egg salad sandwich. I am sure  most  of us have had some "aunt" or lunch lady who insisted that their egg salad was the best, but all it did was scare the crap out of you.

I am not an egg fan. I like omelette's,fried eggs with pytti panna,but never oh NEVER a hard boiled egg on it's own. Lord help me, but noooooo. BUT..... I do just adore egg salad sandwiches.The way I grew up eating them. With chopped crunchy scallions, ribs of celery and pungent draw of the flat leaf parsley. I believe it's a texture thing. With each bite you get the creaminess of the eggs and mayo, the crunch of the celery and the heat from the onions, and the little bit of satisfaction from the parsley. In all a mouthful of goodness.  Yes, we all know that we "can" make our own mayonnaise with a little elbow grease and some patience, but here in Sweden, their mayo" is not what I would call my favorite. I do search high and low for *Kraft Miracle whip    because it would be a miracle if I ever found it here, so I have to settle with *Hellman's mayo at 10 bucks a jar but I am so not complaining. Anything is better than the alternative.Yikes...

cool your eggs under running water 


There is something romantic about boiling eggs. It's a point to where you need to go by instinct when your boiling your eggs. You can time them for 8 minutes from the boil, or you can cheat and have one of those singing eggs that plays some cliche song letting you know which stage your eggs are at. Either way boil your eggs and run them under a cold bath until you can handle them.The cooler they get the less chance you will have of developing the dreaded grey egg syndrome.
chop up your celery and spring onions in small slices and dice up your eggs add to a bowl chop up some parsley and add a few tablespoons of your favorite mayonnaise and add salt and pepper to taste and presto, you have got yourself a really darn good breakfast.
                            
add everything together

Ingredients
6 eggs organic if you can
3 ribs of celery
3 spring onions
½ cup chopped flat leaf parsley
3-4 tablespoons of mayo depending on your like add a little at a time.
salt and pepper to taste

 Nothing is more satisfying when you can whip up something so simple but so wonderful. Hope you all have a better day then I will have:( it's back to bed for me, and more Lego building for Lilla A. See you all soon.

Friday, August 12, 2011

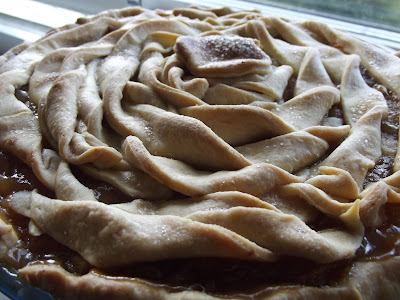
Spiced Apple and Pear Double Crust Pie

For my pie lovers


Okay,so I am a pie lover. There I said it. I learned from my mom, but learned that my paternal grandmother was a fantastic French Canadian pie baker. She made amazing pies and I was told by my father that I could bake a pie like his mother. Bless his soul. Not long after making a custard pie for him. He passed away.( not from the pie!) So, this popples is for you. I hope your enjoying your pie in the sky:) Since shortening*is really hard to find here, or in specialty stores I came up with my own substitute. 


For me  pie is all about the crust. I could really scrape away all the filling and just tuck into the crust. The somewhat salty, tender bite of pie heaven, but let's not kid our selves here we all have been "beaten" by a pie crust that would not cooperate, but hence my lovely reader's I have created a wonderful pliable fantastic pie crust recipe. Oh, how pleased I am to share this with you all.


How to double crust pastry:


Makes pastry for one 10-inch (25cm double pie crust)


2 1/4 cups (540ml) all purpose flour
    1/4 tsp.salt
     1/2 cup (120ml) cold butter, cut into ½ inch small pieces
      1/2 cup (120ml) cold baking margarine, cut into ½ inch small pieces
       1/3 cup (80ml) cold water


ATTENTION:
Make sure all your ingredients are very cold. I set the butter, margarine and water in the freezer for 15 minutes, and place the flour in the refrigerator for 15 minutes as well. It made a world of difference. 


Using your food processor or by hand and pastry cutter and a large bowl, combine the flour,salt, butter and baking margarine.Process or cut in, or until the mixture resembles coarse meal or "pea size" and begins to clump together. Sprinkle with water if needed and let rest for 30-40 seconds and then either process very briefly or cut with about 15 strokes of the pastry cutter, just until the dough begins to stick together and come away from the sides of the bowl.


turn into a lightly floured work surface and press together to form a short tube or cylinder. Divide into 3/3 and 1/3 pieces. wrap in plastic wrap and flatten gently into disk. Set in fridge for at least 20 minutes. Allow the dough to warm slightly at room temperature if it's too hard to roll 
On a lightly floured board roll the larger disk to a thickness of 1/8 inch cut a circle about 1 1/2 inches (3.8cm) larger than your pie plate and transfer to the plate by folding it in half or rolling it onto the rolling pin. turn the pastry edge under, leaving an edge the hands about 1/2 inch  over the plate. Either crimp the top as I have done here, by scalping the edge. 
Roll the second disk as directed by recipe or be creative. I have done a spiral crust design on this particular pie. Beautiful and a bit unusual. 


Ingredients:

melon scooper is great for pears

  • ½ lemon¨
  • 3 pounds baking apples such as golden delicious I used Ingrid Marie about 6-8 in total
  • 1½ pounds of baking pears. such as Bosc or firm Bartletts  I used 6 pears
  • 2/3 cups sugar, plus more for sprinkling on the pie
1 ½ tablespoons of cinnamon

  • 1/4 cup of unsalted butter
  • 1/4 teaspoon ground ginger
  • 1/4 teaspoon fine salt
  • generous pinch of freshly ground nutmeg
  • 1/4 cup all purpose flour
  • ½ teaspoon pure vanilla extract or vanilla sugar 
  • Zest of one lemon
Juice of half a lemon set to the side.


Method:


cooking to a compote 

  • Finely grate the lemon zest and set to the side. Peel, core and then slice both the apples and the pear into ½ inch pieces. Pour the lemon juice over the fruit then toss fruit with the sugar, cinnamon ginger, salt and nutmeg.
  • Melt the butter in a large skillet over medium- high heat or a large pot will do as well.
  • Add the fruit to the melted butter and cook, uncovered until the fruit softens, and the juices evaporate. Can take up to ten minutes. Mix the flour into the fruit; then cook about a minute more to thicken the juices slightly.  
  • (If you have so much juice in the pan after the fruit has cooked and is tender strain the mixture reserving the juice and reduce it down to a thick syrup and then you can use it to drizzle over the finished pie or add it to the whipped cream.)
Finely stir in the vanilla and the lemon zest taste and add more spices if you desire.Remove from heat. The filling should resemble a compote. Cool completely and can store in the refrigerator for 3 days in a sealed container. 


cooled and ready for the top crust
I cut stripes and twisted them around the pie
When you have decided what type of top crust you shall have fill your pie bottom with the filling and arrange the top. I did a spiral pie crust and then sprinkled it with sugar before baking. I tend to like to let the pie sit in the refrigerator for at least 30 minutes before baking.   
  • Bake at 180 degrees c 350 degree f for one hour or until it is all bubbling and the crust is the nice golden brown. 
Let cool  and serve with whipped cream, a slice of cheese or a scoop or ice cream. Enjoy. Have a nice weekend  wherever  you might be.

Tuesday, August 9, 2011

Black bean and fresh corn lime salad with shrimp

summer love...

It's been a lovely summer, and it is that time of year that everything seems to be slowing down. Soon it's back to school here, and the Swedish "industrial" holidays are coming to the end. I am back at work, and I do not have the pleasure to spend hours in the kitchen some days, and so this lovely tangy and crunchy salad is a fantastic quick meal for you. Corn on the cob at this time of the year is  starting to pop up in the markets, and it is so wonderful fresh that it gives this salad the extra wow factor .In the winter months when corn on the cob is hard to find. Feel free to add the frozen or canned versions as it works as well.

I am waiting for my new fuji camera and I am excited to be able to post better quality photo's and hopefully you will want to stop by more often to see what's happening on It's all about the food. I hope that your weather in your part of the world is not giving you the blues today, and if so grab a book curl up on the sofa and hunker down into a bowl full of this very satisfying meal.

summer love'in 
  • Makes enough for 4 large portions
  • 4 fresh corn on the cob husked and rinsed
  • 1/3 cup of fresh lime juice about 3 large limes
  • 1/2 cup olive oil
  • 2 cloves of garlic,minced
  • 1 teaspoon salt
  • 1/8 teaspoon chili powder or more to taste
  • 1 15 ounce can of black beans  drained and rinsed
  • 1 avocado peeled, pitted and diced
  • 1 red pepper diced or sliced into small pieces
  • 2 tomatoes chopped
  • 6 green onions thinly sliced
  • 1 cup of fresh cooked peeled shrimp of your choice
1/2 cup of chopped basil, cilantro and flat leaf parsley


In a small jar with a fitted lid add the lime juice, minced garlic, olive oil, salt,chili powder and cover and shake until well mixed. Set a side. In a large pot add your fresh corn to a pot of well salted boiling water and cook for 10-12 minutes until tender, but not to soft. I like a little extra bite in my corn, so i tend to cook it a little under so it's still that deep golden yellow, but a little hard to the touch.
Remove the corn from the water and let cool until you can handle it.Meanwhile, chop up your vegetables and add them to the bowl. Add your black beans and toss. when you can handle the cobs. Slice off the kernels gently and add them to your other ingredients. 
Give your dressing a good shake and gently pour a little stir and taste and continue to add dressing until it is to your taste. Add some fresh pealed cooked shrimp, toss and enjoy with a good piece of bread and butter what could be better?  

Saturday, August 6, 2011

DULCE DE LECHE - a la confiture de lait

Sweet and condensed milk available most stores or your local Asian Market


By David Lebovitz  via The Perfect scoop


Mmmm...Sweet tooth? Looking for a little love from inside a can? You know who you are, and this little can of goodness is going to make everything bad feel so good. I am not a big sugar eater. I do not have a sweet tooth per say, but this little devilish can can make me melt at the first spoonful.


I recommend that you try this by yourself first(then you do not have to share), and nobody but you will only know just how much you ate. Give it a try, I am sure you will not be sorry.


Preheat oven to 425 Degrees F (220 degrees C)


Pour one can (400 g/14 ounces of sweetened condensed milk(not evaporated milk) into a glass pie plate or any other shallow baking dish. Stir in a few flecks of sea salt. Just a pinch.


adding hot water
Set the glass bowl/ pie plate within a larger pan, such as a roasting pan, and add hot water until it reaches halfway up the side of the pie plate. 


Cover the plate snugly with aluminum foil and bake for 1 hour to 1 1/4 hours. Check a few times during baking and add more water to the roasting pan as necessary.


Once the Dulce de Leche- A la Confiture de Lait is nicely browned and caramelized, remove from the oven and let cool, whisk until smooth. Store in the refrigerator until ready to serve. Warm gently in a warm water bath or microwave oven before using. 


This is magical stuff. You can add it to almost anything you bake. Pies, cookies would be great in my take on Donna Hays, Shortbread filled cookies in my archive. Warm it up and drizzle over your favorite ice cream, so many options. I still love it right out of the jar. Pure comfort and a extra twinkle in my eye with ever spoonful.